Award

Testimonials
"It does a great job. If you are looking for an image converter , it may be of help."
- Softpedia
"It is very easy to use.
It is very effective in what it does.
I am very happy!"
- Andrew MacArthur
Find Us
Hot Guides & Tutorials
How to Batch Convert and Resize Pictures to Your Blog
While it is very cool to add pictures to your blog, when facing a mass of pictures with different size and format that you want to send to your blog, but there exists a problem that the size is too big to send and the format is not uniform, for this, you need to change the size and format first. Dealing with image sizes and formats can be a bit tricky sometimes, especially if you have no skills about image resizing.
With PearlMountain Image Resizer, you can convert and resize pictures with a little effort. It’s a perfect tool and it can batch convert and resize hundreds of images in one time with a few mouse clicks. Below are step-by-step instructions on how to batch convert and resize pictures to blog using PearlMountain Image Resizer.
Firstly, you should download and launch PearlMountain Image Resizer.

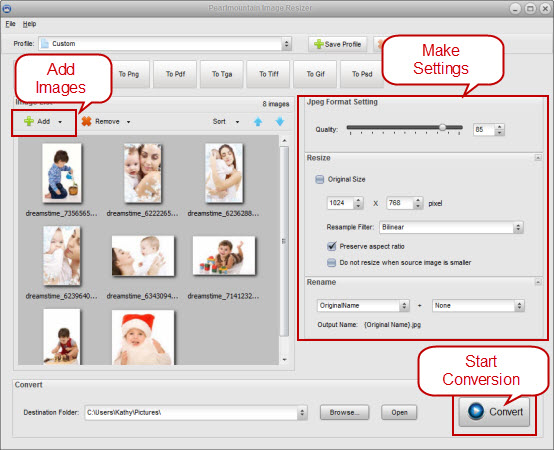
Step 1: Add Images
- Click “Add” or “Add Folder” button to add hundreds of pictures that you want to convert and resize to your blog, in the opened window browse for the necessary pictures and press the Open button.
- All loaded pictures will be displayed in the Preview Area.
Step 2: Make Settings
- Choose the output format you want your pictures to convert,for most situation,the pictures posted on the blog are JPG format,click “To Jpeg” then the format settings will be set automatically on the right window.
- You could personalize the format settings by dragging the Quality slider and changing the size by inputting you wanted numbers that is suitable for blog.
- Next, input the name, you could see the “Output Name” changes as you input the name and suffix. Meanwhile, you could keep images as “Original Name".
Step 3: Start Conversion
- After finish format settings, you need to select the location where you want the new pictures saved to. Click “Browse” button to choose a destination folder that is convenient for you to locate and use.
- Press the “Conver” button to start converting images. After conversion, the converted images can be found in the destination folder.
By using free PearlMountain Image Resizer you can quickly batch convert and resizepictures to your blog, this software also provides all the most popular graphic formats so you won't need to use other expensive programs.
Related Software
PearlMountain Image Converter allows youto convert images to other formats, resize, rotate, crop, add watermark, apply effects and add border to thousands of images at a time. It supports the 60+ image formats, including the most popular ones: JPEG, BMP, TIFF, PNG, PSD, GIF, TGA, ICO, PDF, RAW and many others.
![]() Buy PearlMountain Image Converter ( $29.90 )
Buy PearlMountain Image Converter ( $29.90 )