Award

Testimonials
"It does a great job. If you are looking for an image converter , it may be of help."
- Softpedia
"It is very easy to use.
It is very effective in what it does.
I am very happy!"
- Andrew MacArthur
Find Us
Hot Guides & Tutorials
How to Resize Image for Mobile Phone
The resolution ratio of photos that taken with cameras is larger than those taken with cell phones, so it’s not easy to send images from a computer to a mobile phone. Sometimes the image/photo size and format are not right, or sometimes the image file size is too big and you can’t upload to mobile phone. In this case, resizing the image makes it easier for users to upload the pictures to a phone and does not take much the cell phone's memory. There are some images tools available to make the image smaller and its a practical tool that can resize photos/images for any size you want.
PearlMountain Image Converter, which is a practical tool for you to resize images/photos, making them faster to upload, download and e-mail and will be quickly used on your mobile phone. It can help you edit a digital image even if you are still inexperienced. It’ a special tool that allows you to convert, resize and rename hundreds of images files in one time with a few mouse clicks. You can also use this tool to resize photos so they'll fit on your mobile phone.
The following steps will teach you on how to resize photos/images for Mobile Phone use PearlMountain Image Converter. Firstly, you should download and launch PearlMountain Image Converter.
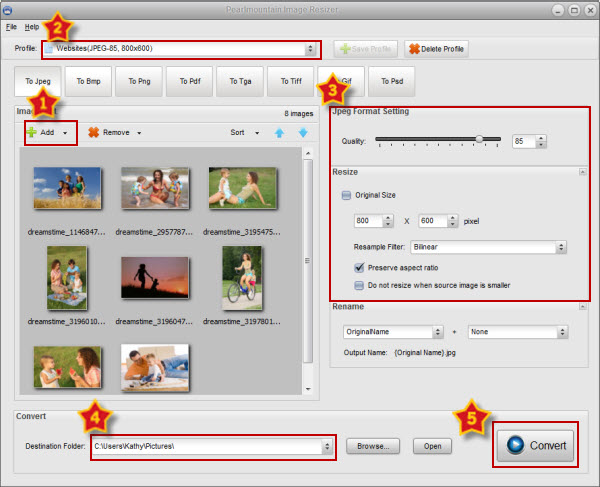
Step 1: Add Images
Open the folder where your pictures are located. Add images you want to convert and resize for your mobile phone. All loaded images will be displayed in the Preview Area. You can deal with the photos by adding, removing photos, arranging the order of photos.
Step 2: Choose Output Format
Click the one of the formats you want your images to be converted, such as JPEG, the format and resize settings will be set automatically on the right window. The other formats, like PNG, TIFF, PDF, etc, all have their corresponding settings.
Step 3: Format Setting
Set the image quality by dragging the Quality slider, and input a number what you want your images to be in the space behind the slider.
Step 4: Rename
Use “Original Name” to keep the original name of the images. You can also change the name of images. The “Output Name” will change as you inputting the name and suffix.
Step 5: Save
Choose a destination folder to save the converted images. Click “Browse” button to choose destination folder that is convenient for you to locate and use or you could save it in the original folder.
Step 6: Convert
Press the “Convert” button to start converting images.
After the conversion process completed, the converted images will be ready for mobile phone. You can upload them to these devices immediately. With this image editing tool, you can accomplish your thousands large files at one time in only few mouse clicks.
Related Software
PearlMountain Image Converter allows youto convert images to other formats, resize, rotate, crop, add watermark, apply effects and add border to thousands of images at a time. It supports the 60+ image formats, including the most popular ones: JPEG, BMP, TIFF, PNG, PSD, GIF, TGA, ICO, PDF, RAW and many others.
![]() Buy PearlMountain Image Converter ( $29.90 )
Buy PearlMountain Image Converter ( $29.90 )