Award

Testimonials
"It does a great job. If you are looking for an image converter , it may be of help."
- Softpedia
"It is very easy to use.
It is very effective in what it does.
I am very happy!"
- Andrew MacArthur
Find Us
Hot Guides & Tutorials
PearlMountain Image Resizer Pro Program Interface
The PearlMountain Image Resizer Pro main window may be divided into the following parts:
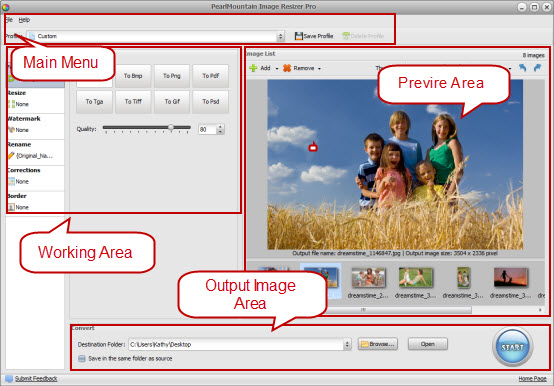
Main Menu
The Main Menu consists of the following items which allow you to get quick access to the most frequently used program functions.
File
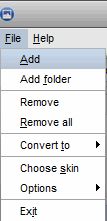
Add - Use it to add the image files you need to resize.
Add Folder - Use it to add the folder with the image files you need to resize.
Remove - Use it to remove the currently selected image file from the program.
Remove All - Use it to remove all the image files added to the PearlMountain Image Resizer Pro program.
Convert - Use it to start converting images progress.
Choose Skin - Use it to change the skin of the program.
Options - Use it to open the adjustment options of PearlMountain Image Resizer Pro.
Exit - Use it to close the PearlMountain Image Resizer Pro window and finish the work with the program.
Help
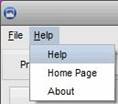
Help - Use it to open the PearlMountain Image Resizer Pro help file.
Home Page - Use it to open the PearlMountain web site.
About- Use it to open the window with the information of PearlMountain program.
Profile
PearlMountain Image Resizer Pro provides preset profile which allows you to get quick access to frequently used size.
![]()
Profile Combox - The program provides the most popular used predefined profiles in the drop-down list area.
Save Profile - You can save the frequently used custom settings as profile, simply click Save Profile button.
Delete Profile - Click the Delete Profile button to delete an unwanted profile you have currently chosen.
Below is the most popular image profile list:
Profile |
Format |
Size |
Android |
JPEG-85 |
800×480 |
JPEG-80 |
640×480 |
|
iPad |
JPEG-85 |
1024×768 |
iPhone |
JPEG-85 |
480×320 |
iPhone4 |
JPEG-85 |
960×640 |
Photo |
JPEG-90 |
4×6inch,300dpi |
Photo |
JPEG-90 |
5×7inch,300dpi |
Photo |
JPEG-90 |
6×8inch,300dpi |
Photo |
JPEG-90 |
8×10inch,300dpi |
QVGA Phone |
JPEG-85 |
320×240 |
Sony PSP |
JPEG-85 |
480×272 |
Thumbnail Large |
JPEG-80 |
128×128 |
Thumbnail Medium |
JPEG-80 |
96×96 |
Thumbnail Small |
JPEG-80 |
48×48 |
Websites |
JPEG-85 |
800×600 |
Preview Area
The Preview Area is used to add images or image folder you need to resize. You could manage and preview images after they have been added.
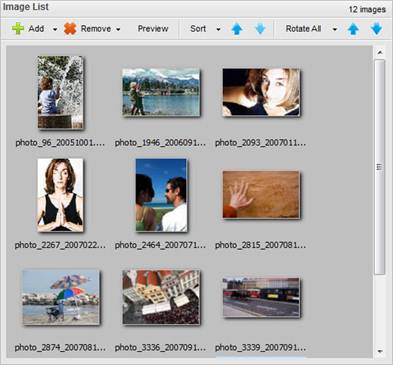
Add - Use this button to add images. Click the drop-down button and choose Add folder with the image files you need to resize.
Remove - Use this button to remove unwanted images. Click the drop-down button and choose Remove All to remove all the images in the image list.
Preview/Thumbnail - Use it to switch between Preview and Thumbnail mode.
Sort - Use it to adjust the sequence of images automatically.
Rotate All - Use it to rotate all the image files added to the program. Click the arrow near this button and it will display the additional options.
Rotate Left - Use it to make the selected image to turn to left.
Rotate Right - Use it to make the selected image to turn to right.
Working Area
The Working Area of the PearlMountain Image Resizer Pro is used to adjust output image settings, apply various effects, add watermark, resize as well as rename the images.
Format
PearlMountain Image Resizer Pro supports the most popular image formats: JPEG, BMP, TIFF, PNG, PSD, GIF, TGA, RAW, and almost all image formats.
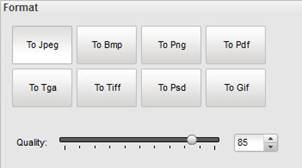
Jpeg: (Joint Photographic Experts Group JFIF Format): Use it to set JPEG as an output image format. You will be able to adjust the quality of your images using the slider below.
Bmp (Microsoft Windows bitmap): Use this button to set BMP as an output image format.
Png (Portable Network Graphics): Use this button to set PNG as an output image format.
Pdf (Portable Document Format): Use this button to set PDF as an output image format. You will be able to select the page size from the drop-down list below and save your images in one document.
Tga (Truevision Targa image): Use this button to set TGA as an output image format. You will be able to select the compression type from the drop-down lists below.
Tiff (Graphics Interchange Format): Use this button to set TIFF as an output image format. You will be able to select the compression type from the drop-down lists below.
Psd (Adobe Photoshop bitmap file): Use this button to set Psd as an output format.
Giff (CompuServe Graphics Interchange Format): Use this button to set Giff as an output format. You will be able to create an animated GIF image.
Resize
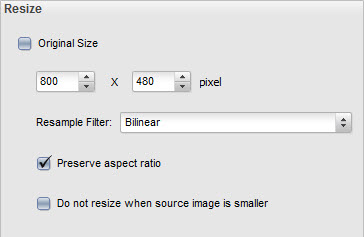
Original Size - Keep the original size of the image.
Advanced Size Setting - Use it to adjust your image size by inputting your needed size.
Preserve aspect ratio - Keep the width-length ratio of images.
Do not resize when source image is smaller - When the selected image is larger than the original image, the program will save the original size of the image.
Watermark
Image watermark
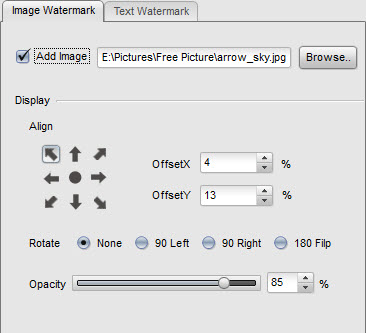
Add Image - To add image watermark check the Add Image box and click the Browse button to choose the image you need.
Display
Align - Use it to set the way of image watermark alignment, you can select one icon listed below, or you could customize the Offset by inputting the numbers below.
Rotate - Use it to rotate image watermark added to the image. You can choose None, 90 Left, 90 Right and 180 Flip rotate option.
Opacity - Use it to set the opacity of the watermark transparency (can differ from 0 with full transparency to 100 with no transparent color).
Text Watermark
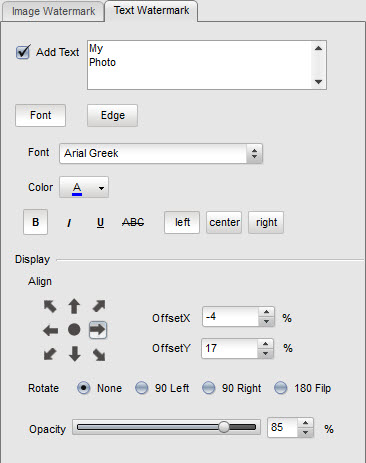
Add Text - To add a text watermark check the Add Text box and type the text you need in the field next to it.
Font
Font - Use it change the text font-face filled in the text watermark. You can select a font-face in the drop-down list.
Color - Use it to select the color to fill in the main text.
Font style - You can use font style in the text watermark, select B for a bold text, I for an italicized text, U for an underlined text and ABC for a strikethrough text, left used to align text watermark to left, center used to align text watermark in center, right used to align text watermark to right.
Edge
Enabled - Use it to switch the text edge display on and off.
Color - Use it to select the color of the edge.
Thickness - Use it to set the thickness of the text edge.
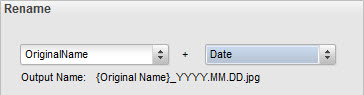
Rename
Original Name - Use it to keep the original name of the images.
Advanced Name - Use it to change the name of images, you could see the Output Name will change as you input the name and suffix.
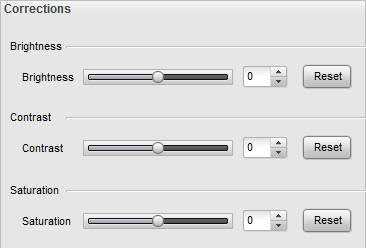
Corrections
Brightness - Use it to adjust the brightness of the images.
Contrast - Use it to adjust the contrast of images.
Saturation - Use it to adjust the saturation of images.
Output Image Area
Output Image Area is a part of the PearlMountain Image Resizer Pro main window where you can set the location for your output image and start the conversion process.

Destination Folder - Choose image directory to save converted images.
Browse - Browse for a destination folder to save the converted images.
Open - Use this to open the destination folder.
Convert - Use this to start converting images.
Related Software
PearlMountain Image Converter allows youto convert images to other formats, resize, rotate, crop, add watermark, apply effects and add border to thousands of images at a time. It supports the 60+ image formats, including the most popular ones: JPEG, BMP, TIFF, PNG, PSD, GIF, TGA, ICO, PDF, RAW and many others.
![]() Buy PearlMountain Image Converter ( $29.90 )
Buy PearlMountain Image Converter ( $29.90 )